Showing posts with label on. Show all posts

Friday, March 14, 2014

Find a Word or Phrase in a Document or on a Website!

Its time for another little tip for "Technology Tip Thursday!"

This one is a gem... it can be used in so many programs!  Use it in Word and PowerPoint... or use it in Internet Explorer, Chrome, Safari or Firefox!  As far as Ive been able to find, it works in almost every program!  So... if you want a quick way to find a word or phrase in a document or on a website, this is the perfect tip for you!


Try it out and let me know how you like it! 
Read More..

Saturday, March 8, 2014

Keyboard Shortcut to Alight Your Text on the Right!

Its time for another quick little technology tip for "Technology Tip Thursday!" 
This one is also for Microsoft Word and PowerPoint, though you should definitely try it in other programs as well... it just might work!


Try it out and let me know how you like it! 
Read More..

How to Superimpose Text on a Image

Here we are again... another week, another poll, another Technology Tuesday!  The winner this week was how to superimpose text over an image!


Thank you so much for visiting my blog each week and voting! 


First things first, download Gimpshop so you can practice along with the following directions!  Gimpshop is the same program we used to give a picture a transparent background and blur out faces/names in a picture, so you may have already downloaded it.  If not, be sure to download it for free!

Now... lets put that text in place!


You can download this tutorial as a PDF by clicking this picture!
Note: This tutorial is hosted on Google Docs.  To save it from there, just open the file and click File > Download to save onto your computer!

Thank you for visiting this Technology Tuesday Post!  Be sure to vote for what I should blog about next Tuesday!
Read More..

Thursday, March 6, 2014

How to Claim Your Blog on Bloglovin

This is a post for all of the bloggers out there... how to claim your blog on Bloglovin!


You can download this tutorial as a PDF by clicking this picture!
Note: This tutorial is hosted on Google Drive.  To save it from there, just open the file and click File > Download to save onto your computer!

Read More..

Wednesday, February 26, 2014

How to Print on Sentence Strips

Here it is... the long awaited post... How to print on sentence strips!  I have to say, ever since I figured out how to do this, I have not written on a sentence strip since!


Now I will forewarn you... this will be as easy or as difficult as you make it!  If you use the template as is (with the Comic Sans font), it will be relatively easy.  If you want to change the font, it will be a bit more difficult. 

The poll was a landslide again... and a record 75 votes!  Thanks everyone!


Now, without further delay, lets get started!  First things first, click the picture below to download the template!


Note: This preview is hosted on Google Docs.  Be sure to open the file and click File > Download to save onto your computer before starting the tutorial!


Now... what if you have a favorite font that you want to use?  Lets talk about how to change the font.  Remember, this tutorial is as easy or as complicated as you want to make it... this is the time it gets a bit more complicated.  But remember... if you change the font and all of its properties below once, you can save it to use forever!


Thanks for stopping by again this week!  Let me know how it goes when you try it!

You can download this tutorial as a PDF by clicking this picture!
Note: This tutorial is hosted on Google Docs.  To save it from there, just open the file and click File > Download to save onto your computer!
 
Since you have to cut the sentence strip in half to print on it, I always store them in laminated envelopes.  For the poll for next week, I think Ill add how to laminate envelopes!  Be sure to vote!

Im also linking this template up with manic monday!
Classroom Freebies Manic Monday
Read More..

Sunday, October 13, 2013

Unlock iPhone 3GS On iOS 5 0 1 By Patching Ultrasn0w 1 2 4

iOS 5.0.1 is out from past couple of weeks but still an Ultrasn0w update has not been released in order to unlock iPhone 3GS with BB 6.15.00 on it. A lot of users who restored iOS 5.0.1 on their iPhone 3GS but rely on unlock were stuck with a “No Service” error on their Home Screen. Yesterday we posted about Ultrasn0w fixer which is a third party solution to unlock your iPhone 4 and iPhone 3GS on iOS 5.0.1 but that solution is having some problem. Some people were getting dependency issues and even developers of that tweak refused release a fix for it.
Anyhow, folks over BiPR came up with a brilliant manual Ultrasn0w patch which will fix ultrasn0w 1.2.4 and make it work on iPhone 3GS running iOS 5.0.1. Don’t panic it’s an easy process and we tried it personally and we can confirm that it works for iPhone 3GS iOS 5.0.1.
Important: By following this method you can ONLY unlock iPhone 3GS running iOS 5.0.1 with iPad’s baseband 6.15.00 (which most of iPhone 3GS users are running now). DO NOT try it on iPhone 4.
How To Unlock iPhone 3GS On iOS 5.0.1 BB 6.15.00 By Patching Ultrasn0w 1.2.4:
Things you will need during this process:
  • Jailbroken iPhone 3GS running iOS 5.0.1 with baseband 6.15.00 (If you’re not jailbroken on iOS 5.0.1 you can follow our complete step by step guide to jailbreak it using Sn0wbreeze )
  • Ultrasn0w 1.2.4 patch file (Download)
  • iFile (if you don’t have it in your iPhone you can get it by adding xSellize Repo repo )
  • iExplorer (Download for Windows | Mac)
Before you begin: Take out SIM card from your iPhone
Step 1: Download Ultrasn0w 1.2.4 patch file from the link above and extract it on your desktop.
Step 2: Connect your iPhone 3GS to computer via USB cable.
Step 3: Run iExplorer which you downloaded from the link above, it will automatically detect your iPhone 3GS and display your iPhone 3GS’s files in Windows Explorer like view.
Step 4: Navigate to
raw file system/System/Library/Frameworks/CoreTelephony.framework/Support/
Step 5: Before making further changes, back-up CommCentreClassic file by renaming it to CommCentreClassicOld and to be on the safe side save a copy of it locally on your computer as well.
Step 6: Copy and Paste CommCentreClassic file which you downloaded and extracted on desktop in Step 1
Step 7: Now let’s get back on your iPhone 3GS, launch iFile on your iPhone 3GS and navigate to :
System/Library/Frameworks/CoreTelephony.framework/Support/
Step 8: Tap on commcenterclassic, click the Blue arrow next to the file name, go to Access Permissions and set the following permissions:
  • User: Read, Write, Execute
  • Group: Read, Execute
  • Global: Read, Execute
Step 9: Launch Cydia from your iPhone 3GS’s homescreen and install ultrasn0w 1.2.4 from there.
Step 10: Disable 3G option and Cell Data Network under Settings > General >Network. Now you can insert your SIM card
BOOM! You iPhone 3GS with baseband 6.15.00 should be unlocked on iOS 5.0.1 now.
If you face any problems during this process feel free to contact us, we’ve tested this process and we can confirm that it works perfectly fine.

If an Ultrasn0w update comes for iOS 5.0.1 which is expected very soon all you have to do is replace the patched file with your back-up file and re-run ultrasn0w
Read More..

Friday, October 11, 2013

Siri on an iPad


When Apple first announced Siri, one of the most frequent questions about the digital assistant was which devices would it support. Unfortunately, it didn’t take long to realize that Apple was limiting the voice-recognition service to just the iPhone 4S. I was particularly surprised that Siri wasn’t coming to the iPad 2, seeing as it’s equipped with the same A5 processor as the 4S.

Well it looks like I wasn’t the only one interested in Siri on an iPad. A jailbreak developer known on twitter as Jackoplane tweeted screenshots of Siri enabled in the settings of a jailbroken first-gen iPad.

Unfortunately, though, there appears to be an issue – jailbroken Siri doesn’t play nice with Apple’s server. So, any command that requires contact with Apple servers is not possible on a device other than the iPhone 4S.

But other than the server issue, the successful port of Siri to the iPad means that there might some hope.

Via: CNET

Read More..

Wednesday, October 9, 2013

How to Use 3D Maps on the iPad or Phone

With the launch of iOS 6, iPad and iPhone users will now have the ability to view 3D maps on their devices. Curious how you can get in on this 3D mapping action? Then continue reading below for instructions on how to use 3D maps on the iPad and iPhone.

To clear up any misconceptions, you’re not going to be needing special glasses because this is not “Avatar throw your popcorn in the air” 3D. This 3D map mode provides three-dimensional renderings of things such as buildings and so on. It can be viewed “Standard” map mode or “Satellite” mode, which overlays aerial photography onto the 3D geometry.


Apple is dropping Google Maps as the mapping service that powers the Maps app and is instead rolling out their own mapping service. This has been made possible by Apple’s acquisition of multiple companies over the last several years. Let’s take a look at each of these companies annual reports. Not interested? Ok, let’s just focus on how to turn on 3D maps on your iPad or iPhone.
Click here to enlarge
You Will Need:
Instructions:
1. Open the Maps app on your iPhone or iPad.
2. Navigate to whatever location you wish to view in 3D.
3. Touch the “3D” button in the bottom left of the screen to enable 3D. Once you are in 3D mode, you can switch to Satellite view just as you would in normal 2D maps by touching the “peeling paper” button in the bottom right of the screen and selecting “Satellite”.
4. To change the angle that you are viewing the 3D maps, swipe the screen up and down with 2 fingers.
5. To turn off 3D, simply touch “3D” again to go back to Standard view.

Note that not all locations will have 3D buildings available, but this will improve over time as Apple builds out the database.
Read More..

Tuesday, October 8, 2013

We did it Siri on iPod Touch 4G Connected to Apple Servers Finally Video

Heres a new significant and big step on porting Siri on iPhone, iPod Touch and iPad. The last few weeks we saw many screenshots and videos showing Siri running on all iDevices but without connecting Apple servers. Now hackers has just did it.


Steven Troughton-Smith is the guy behind this progress. This guy was the first one worked on porting Siri on iPhone 4 with the iPhone developer Chpwn. Few minutes ago Chpwn confirmed on his timeline that siri connected Apples servers on iPhone 4 after hack session.

When Siri come to iPhone 4, 3GS, iPod Touch 4G, 3G, iPad ?
No official release date announced so far. But diffidently it looks very imminent.

Siri on iPod Touch 4G [Video] :

Update : Folks at 9to5mac filmed an interesting video that compared between iPhone 4 and iPhone 4S running Siri


Heres an interview with Steven the guy behind this great job.
Mark: Where do you go from here with the port?

Steven: At this point it’s all about confirming this works across devices, making it reproducible (we got it working on two devices today), and documenting everything. It does require files from an iPhone 4S which aren’t ours to distribute, and it also requires a validation token from the iPhone 4S that has to be pulled live from a jailbroken iPhone 4S, and it’s about a 20-step process right now.

Mark: In its current state, is the port 100% functional, is there anything you would like to see work better?

Steven: Yes, it seems to be 100% functional. I’m working on the rough edges, but everything that works on the iPhone 4S seems to work here

Mark: Do you ever see Siri showing up in Cydia (or another jailbreak store) for non natively supported devices?

Steven: No, I could not be a part of that. I have no doubts that others will package this up and distribute it quasi-illegally, or try and sell it to people. I am only interested in the technology and making it work; proving that it works and works well on the iPhone 4 and other devices

Mark: So, you also got Siri working on the fourth-generation iPod touch, how is that working out?

Steven: We got chpwn’s iPod touch up and running with Siri after proving it works on my iPhone 4. Unfortunately the microphone on the iPod is nowhere near as good as the iPhone – you will notice that the Siri level meter hardly moves when you talk to it. While it does work, you have to speak loudly and clearly to the iPod

Mark: How long did porting take you, what was the “I got it” moment?

Steven: Basically, I already had everything I needed to make it work. I had spent a lot of time mapping out in my head exactly how Siri works on the iPhone. All I needed was access to a jailbroken iPhone 4S to put my hunch to the test. It literally took no longer than 10 minutes to put all the pieces in place and perform our first test on my iPhone 4, and it was an instant success.
Read More..

Monday, October 7, 2013

Sn0wbreeze 2 8b1 Released To Jailbreak iOS 5 Beta 1 Tethered On Windows

iH8sn0w has finally updated sn0wbreeze. Sn0wbreeze 2.8b1 is now available for download and will jailbreak iOS 5 beta 1 tethered on iPhone, iPad and iPod touch.
sn0wbreeze v2.8 BETA 1 Release Notes:
————————————–
* Supports iOS 5.0 BETA 1 (9A5220p)
* Supports the following Devices:
- iPhone 3GS
- iPhone 4 [GSM]
- iPhone 4 [CDMA]
- iPod Touch 3G
- iPod Touch 4
- iPad 1G
————————————–
* Props to @MuscleNerd for the kernel patches. :)
————————————–
* THIS IS INTENDED FOR DEVELOPERS ONLY!!!
* This sn0wbreeze does NOT add afc2 or Hacktivate to prevent users from removing the UDID check after jailbreak.
* UNLOCKERS SHOULD STAY AWAY!!!
* This is a /TETHERED/ jailbreak via iBooty.
————————————–
Now available at: http://ih8sn0w.com/sb28b1
————————————–
// iH8sn0w
Please keep in mind that iOS 5 beta 1 jailbreak is tethered as of now and will require you to connect your jailbroken device to the computer every time you boot it up
Read More..

Sunday, October 6, 2013

How To Unlock iPhone 4 3GS on iOS 4 3 1 with Ultrasn0w 1 2 1 Guide

iPhone Dev-Team has released ultrasn0w 1.2.1 unlock to support iOS 4.3.1 unlock on old basebands and to fix signal issues which reported by some users after jailbreaking iPhone 4, 3GS on iOS 4.3.1
We’ve pushed out the 4.3.1 compatibility fix for ultrasn0w in Cydia — it’s now at version 1.2.1. If you’re not already at 4.3.1 and you need the unlock, please be sure you understand how to get to 4.3.1 using a custom IPSW that doesn’t update your baseband.

This isn’t a new unlock! It’s to allow those who are already unlocked to use FW 4.3.1. It also fixes the signal bar issue for those who aren’t using the unlock but retain an older baseband intentionally.

AFTER INSTALLING ULTRASN0W 1.2.1, PLEASE REBOOT YOUR iPHONE using the normal “slide to power off” swipe. T-Mobile users in the USA also should disable 3G mode in Settings->General->Network.


ONLY
Supported basebands: (01.59.00 / 04.26.08 / 05.11.07 / 05.12.01 / 05.13.04 / 06.15.00)
iPhone 3GS preparation for unlock: you have to jailbreak and update your iPhone 3GS to 6.15.00 baseband on iOS 4.1 / 4.2.1

Step 1: You have to jailbreak your iPhone 4 / 3GS on iOS 4.3.1 with preserving your old baseband,

Step 2: Once you jailbreak yoour device, you can now unlock your iPhone 4 / 3GS with Ultrasn0w 1.2.1 from Cydia. To do so, follow the steps below:
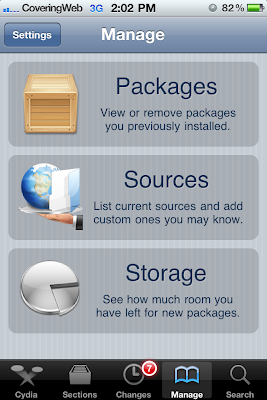
  • Press to launch Cydia Installer from your SpringBoard.
  • Press to select the Manage tab at the bottom of the screen.
  • Press to select the Sources button.

Click here to enlarge
  • Now touch on Edit and then on Add. You will be prompted to enter the URL of the source. Type http://repo666.ultrasn0w.com and touch on Add Source to add this repository.
Click here to enlarge

Cydia will now automatically update your sources by following a series of automated steps.
  • After installation is completed. Search for “ultrasn0w 1.2.1” in Cydia and install this application. This app will automatically unlock your iPhone so that you can use it with any carrier.
Click here to enlarge

Step 3: Almost done, now simply reboot your iPhone and you should have a fully unlocked iPhone 3GS / 4 on iOS 4.3.1.
Read More..

Saturday, October 5, 2013

WWDC 2012 and the surprises Apple will announce jailbreak is on !!!


HOT WWDC 2012 and the surprises Apple will announce jailbreak is on !!!

With only a week to go before WWDC 2012 and the surprises Apple will announce there, today seems like a good time to release updates to our suite of free software to include the rocky-racoon jailbreak and untether developed by @pod2g and @planetbeing!

Today’s updates are:


  • PwnageTool 5.1.1
  • redsn0w 0.9.12b1
  • cinject 0.5.4 (version 0.5.3 also had rocky-racoon but this includes some updates)
  • ultrasn0w 1.2.7 (5.1.1 compatibility only - no new baseband support)


If you’ve already installed rocky-racoon, don’t bother reinstalling it unless you’ve had problems and would like to try a different tool. The underlying untethered jailbreak (rocky-racoon) is identical to what is already installed by last week’s tools like Absinthe, cinject-0.5.3, and the rocky-racoon Cydia package — only the injection method offered by the above tools differs.
redsn0w allows owners of A4+earlier devices to install rocky-racoon two different ways:

  • backup/restore method similar to Absinthe and cinject
  • its traditional limera1n-based ramdisk install. If you have a lot of media on your A4 device (music, movies, TV shows, etc), then the ramdisk method is preferrred because it avoids any possibility of later problems related to syncing to iCloud (including Photo Stream and Music Match). The ramdisk method is not available for A5 devices or later because limera1n can’t be used. If you’d like to use redsn0w’s ramdisk method, just be sure to put the A4 device in DFU or Recovery mode before starting redsn0w (otherwise it will immediately start to use the backup/restore method).


We’ve also added a new redsn0w feature specifically for those who got in on the SAM unlock: you can now include your SAM tickets as part of your initial ramdisk jailbreak of iPhone4 or earlier, or alternatively you can upload your SAM tickets to any device after its been jailbroken. redsn0w accepts either the individual SAM activation ticket plist file, or the entire zip file created by redsn0w’s “Backup” button. As usual, redsn0w continues to cover all of its previous jailbreaks and untethers (so redsn0w-0.9.12b1 covers everything from 5.1.1 all the way back to 4.1).
PwnageTool also avoids any possible sync issues, but again it applies only to A4+earlier devices.

If you unlock your iPhone with ultrasn0w or a commercial method, you must use PwnageTool to avoid updating your baseband otherwise you’ll lose the unlock. PwnageTool will also jailbreak+untether the AppleTV2,1 5.0_2B206f (unless you customize the IPSW further, you’ll have just basic SSH access to the device).

If you’d like to contribute to those that actually developed rocky-racoon, please visit here (any other links you may see are not going to the actual rocky-racoon developers, they’re being diverted to other “related” or fraudulent accounts).


This particular jailbreak brought an unusual amount of fanfare and hoopla to the table, including “press releases” and other haughty silliness.

We’d just like to take this opportunity to remind everyone that jailbreaking is about freedom, not fame and donations!


Here are the download links. Please use our comment section below to give feedback. Enjoy!


Read More..

Friday, October 4, 2013

Downgrade iOS 5 GM To iOS 4 3 5 On iPhone iPad iPod Touch

Yesterday was a big day starting from the iPhone 4S to the recently released iOS 5 GM for developers. Since iOS 5 GM is installable by everyone, you may have updated to iOS 5 by now. In case you didn’t like the tethered jailbreak, found a few problems on your iOS device or discovered some apps that were not supported, that you desperately needed… you’re in luck: you can downgrade iOS 5 to iOS 4.3.3, iOS 4.3.5 or older.


Click here to enlarge
Before you downgrade, please remember you can only downgrade your iDevice firmware if, and only if, you have saved your SHSH blobs somewhere safely, hopefully with Saurik’s Cydia server, or locally on your machine.
From now on, I will assume you have saved your blobs on Saurik’s Cydia server.

STEP 1: To start with, you need to make sure you have a copy of iOS 4.3.5 or whatever firmware you need to downgrade for your device which you can find and download from here.
STEP 2: Next, you need to make sure your hosts file is pointing to Saurik’s server, and not Apple’s. If you haven’t done this then please check this guide.

Alternatively, use TinyUmbrella to make iTunes look at Cydia’s Server in the Advanced options.


Click here to enlarge

STEP 3:
Now plug in your iOS device, and switch it off, but leave it plugged in.

STEP 4: Put your device into DFU mode, our guide here.

STEP 5: Select your firmware manually to restore to. (Shift on Windows, and option on a Mac)
Click here to enlarge

It says that it will talk to Apple when really, it is talking to the Cydia servers.

Click here to enlargeHey presto! Your device should now have downgraded without a hitch…
But, should your phone should now have an error, such as error 1015, DO NOT PANIC! This is normal and has a quick fix. Just download anduse Recboot to kick it out of recovery mode –
Click here to enlarge
Apple has just released iOS 4.3.5 ipsw firmware for iPhone 4, 3GS, iPod touch 4G, 3G, iPad 2, 1 and Apple TV 2G. As most of you know that iOS 4.3.4 was released on July 15. iOS 4.3.5 firmware come to fix a security vulnerability with certificate validation.


Click here to enlarge
Download iOS 4.3.5 firmware IPSW files (Direct Links) - Official from Apple:
Read More..

How To Use Gevey SIM Ultrasnow 1 2 4 on IOS 5 And What’s the Diffrence


If you decided to unlock your iPhone 4, 3GS on iOS 5 so you have two ways the
  • First way: is to use Ultrasnow 1.2.4 which has released by the Dev- team to unlock iPhone 4, 3GS on iOS 5 which supported these baseband 01.59.00 / 04.26.08 / 05.11.07 / 05.12.01 / 05.13.04 / 06.15.00.
  • Second way: is to use Gevey SIM in order to unlock iPhone 4 on iOS 5 Gevey Sim supported baseband 01.59.00 / 02.10.00 / 03.10.1 / 04.10.1 but notes if you have an iPhone 4 that is currently unlocked with a Gevey SIM card, you can unlock your iPhone on the iOS 5 firmware with the same Gevey SIM card as long as you preserve your baseband while updating to the iOS 5 firmware. So the difference between UltraSn0w and the Gevey SIM card, is that UltraSn0w only supports a limited number of older basebands while the Gevey SIM card supports a limited number of newer basebands.
Days ago we showed you how To Unlock iPhone 4, 3GS On iOS 5 using Ultrasn0w 1.2.4 so how to unlock iphone using Gevey Sim on iOS 5 ? here’s the answer below.

Download Required:

  • Download iOS 5 firmware
  • Download iTunes 10.5
  • Download Redsn0w 0.9.9b5
How to preserve iPhone 4 baseband guide


STEP 1: Connect your iPhone 4 into you computer then open Redsn0w 0.9.9b5.
STEP 2: Now select Extras then “Custom IPSW” option so that you can create your pre-jailbroken custom firmware.
STEP 3: Redsn0w will start cooking your custom IPSW and you’ll get it in few minutes.
STEP 4: Once you get your firmware, select ‘Pwned DFU’ from RedSn0w.
STEP 5: Follow the on-screen instructions to get your iPhone in DFU mode.
STEP 6: Once it’s in DFU mode, close Redsn0w then open iTunes 10.5 downloaded above and you should get your iPhone in Recovery Mode message.
STEP 7: Now hold the Option key on Mac and hit Restore. Point iTunes to your iPhone 4 Custom iOS 5 IPSW which begins with NO_BB. (WARNING: Don’t select the stock one or you’ll lose your unlock)
Read More..

Monday, September 30, 2013

How to Jailbreak Apple TV 2G Untethered on iOS 4 3 1 using Seas0nPass

Pre-launch checklist
  1. Make sure youre running the latest version of iTunes.
  2. Download Seas0nPass: Mac [10.6 or later] | Windows [XP or later]
  3. micro USB cable will be required to complete the jailbreak.
  4. Disconnect all iPods, iPhones, and iPads from the computer before running Seas0nPass.

Step 1: Unzip the Seas0nPass.zip file and launch Seas0nPass.
SP-launch.jpg
Step 2: If your AppleTV is not yet jailbroken, select Create IPSW. (if already jailbroken, and you just need to do a tethered boot scroll down).
SP-main.jpg
Step 3: The latest AppleTV software will be downloaded and used to create a custom jailbroken software file.
SP-create.jpg
Step 4: When prompted, connect your AppleTV using a micro-USB cable (leave power disconnected), and hold both the MENU and PLAY/PAUSE buttons for 7 seven seconds.
SP-restore.jpg
Step 5: iTunes will open automatically and start the restore process.
 SP-itunes.jpg
Step 6: iTunes will confirm the restore when complete - your AppleTV is now jailbroken. Please proceed to the tethered boot section below.

Using Seas0nPass for a tethered boot

Some AppleTV software versions require a tethered boot. This means the AppleTV must be connected to a computer for a brief moment during startup.
Note: The AppleTV MUST be disconnected from the computer (for at least a brief moment) after restoring in iTunes for the tethered boot process below to work properly.
Step 1: Open Seas0nPass and select the Boot Tethered option.
SP-main.jpg
Step 2: When prompted, connect the AppleTV to your computer via USB. Wait for the rapid flashing light then connect the power. Once both are connected hold both the MENU and PLAY/PAUSE buttons for 7 seven seconds.
SP-tetherprompt.jpg
Step 3: Seas0n Pass will complete the tethered boot automatically. Once complete, remove the USB cable and connect the HDMI cable.
Note: Timing is key. Once the you receive the success message shown below, the USB cable should be removed and HDMI cable connected before the light on the front of the AppleTV stops flashing. (Dont worry there is ample to do this, so you dont need Superman speed).
Read More..