Showing posts with label guide. Show all posts
Showing posts with label guide. Show all posts
Sunday, October 6, 2013
How To Unlock iPhone 4 3GS on iOS 4 3 1 with Ultrasn0w 1 2 1 Guide
iPhone Dev-Team has released ultrasn0w 1.2.1 unlock to support iOS 4.3.1 unlock on old basebands and to fix signal issues which reported by some users after jailbreaking iPhone 4, 3GS on iOS 4.3.1iPhone 3GS preparation for unlock: you have to jailbreak and update your iPhone 3GS to 6.15.00 baseband on iOS 4.1 / 4.2.1We’ve pushed out the 4.3.1 compatibility fix for ultrasn0w in Cydia — it’s now at version 1.2.1. If you’re not already at 4.3.1 and you need the unlock, please be sure you understand how to get to 4.3.1 using a custom IPSW that doesn’t update your baseband.
This isn’t a new unlock! It’s to allow those who are already unlocked to use FW 4.3.1. It also fixes the signal bar issue for those who aren’t using the unlock but retain an older baseband intentionally.
AFTER INSTALLING ULTRASN0W 1.2.1, PLEASE REBOOT YOUR iPHONE using the normal “slide to power off” swipe. T-Mobile users in the USA also should disable 3G mode in Settings->General->Network.
ONLY Supported basebands: (01.59.00 / 04.26.08 / 05.11.07 / 05.12.01 / 05.13.04 / 06.15.00)
Step 1: You have to jailbreak your iPhone 4 / 3GS on iOS 4.3.1 with preserving your old baseband,
Step 2: Once you jailbreak yoour device, you can now unlock your iPhone 4 / 3GS with Ultrasn0w 1.2.1 from Cydia. To do so, follow the steps below:
- Press to launch Cydia Installer from your SpringBoard.
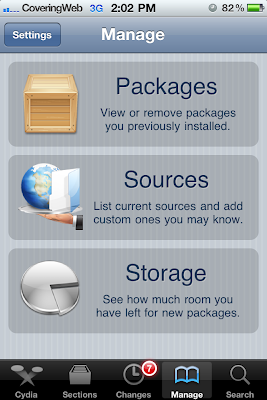
- Press to select the Manage tab at the bottom of the screen.
- Press to select the Sources button.
- Now touch on Edit and then on Add. You will be prompted to enter the URL of the source. Type http://repo666.ultrasn0w.com and touch on Add Source to add this repository.
Cydia will now automatically update your sources by following a series of automated steps.
- After installation is completed. Search for “ultrasn0w 1.2.1” in Cydia and install this application. This app will automatically unlock your iPhone so that you can use it with any carrier.
Step 3: Almost done, now simply reboot your iPhone and you should have a fully unlocked iPhone 3GS / 4 on iOS 4.3.1.


Wednesday, October 2, 2013
HOW TO The Complete Idiots Guide To Downgrading From iOS 5 To 4 X
Well you had to do it didn’t you. You just had to taste that forbidden fruit… and now you have been cast from the garden, and are sitting in the dark… alone… with a pretty black brick that used to be your beloved iPhone. Attempts to roll back have left you frustrated and your soul seeks guidance… Not to fret! We are here to help bring you back from the abyss!
Before we get started, here is a few items you will need to acquire…Now that we are all Squared away there, you will need to download the following items before you can proceed.
- Some ice for your head, to sooth it from all the pounding against the desk
- A cold drink (this may take a min)
Ok that was fun. Now what? The rest of this walk threw assumes you have at least a somewhat higher IQ then that bricked iPhone your holding. If not, stop here and check craig’s list, perhaps someone there can help you.
- The IPSW of choice (I would recommend 4.3.3 as it is jailbreakable and still being signed by apple. I can’t think of any logical reason why you would want to roll back further… But, your are not the logical type now are you (as proved by your updating to a buggy beta without any means of correcting your own mistake! What were you thinking!). Just make sure you have your SHSH stored with Cydia if you choose to go older then 4.3.3) this can be found up there in the corner under the downloads link. Just find your device and go.
- TinyUmbrella. This can be found at http://thefirmwareumbrella.blogspot.com/ . Just download the version that will work for your system. I’m assuming your on a Mac, so this guide will be based on that system. Otherwise it’s similar, so follow along anyway.
- iTunes 10.5 beta. You should have this already as you needed it to install 5.0beta, but just google it, if for some reason you don’t already have it. (I can’t link that here, sorry folks)
If you are wanting to roll back to 4.3.3 (which should be most of you who are not drooling on themselves), follow these easy steps
- Open iTunes
- Plug in your device
- Enter DFU mode
Steps to enter DFU mode:
- Turn device off
- Hold power button for 3 seconds
- Without releasing power button, hold down home button for 10 seconds
- Release power button, but continue to hold the home button until iTunes recognizes your iPhone in recovery mode. If you did it right, it should just have a black screen with no connect to iTunes logo.
5. Hold down the option key and click the restore button in iTunes6. ```wse to wherever you have your IPSW saved and select it.
7. iTunes will give you some gibberish about wiping out all your data… I know you might not be able to read it, just click the flashing ok button.
8. Sit back and do whatever it is you do while your computer is working (just try not to drool on the keyboard.)
9. If you are using an iPhone 4, you should be done. If not, you have received some sort of error more then likely. This is normal. Open TinyUmbrella and click the exit from restore button.10. YOUR DONE!!! Be sure to put your helmet back on before you go outside
NOTE: if you have changed your host file for cydia, you have to change it back to use this guide. TinyUmbrella will do this for you in the advanced tab.


Saturday, September 28, 2013
Guide iPhone Backup with iTunes using WiFi USB Cable
GSM-Fuckrum has a paste and copy solution here is the real thing..
iOS: How to back up
Summary
This article describes how to back up your iPhone, iPad, or iPod touch using iCloud or iTunes.
Products Affected
iPad, iPhone, iPod touch
iCloud and iTunes can back up most data on your iPhone, iPad, or iPod touch.
Backed-up information includes purchased music, TV shows, apps, and books*; photos and video in the Camera Roll; device settings (for example, Phone Favorites, Wallpaper, and Mail, Contacts, Calendar accounts); app data; Home screen and app organization; Messages (iMessage, SMS, and MMS), ringtones, and more. Media files synced from your computer aren’t backed up, but can be restored by syncing with iTunes.
* Backup of purchased music is not available in all countries. Backup of purchased TV shows occurs only in the United States. Previous purchases may not be restored if they are no longer in the iTunes Store, App Store, or iBookstore.
Collapse All Sections | Expand All Sections
iCloud
How to back up
iCloud automatically backs up the most important data on your iOS 5 device. After you have enabled Backup on your iPhone, iPad, or iPod touch in Settings > iCloud > Backup & Storage, it will run on a daily basis as long as your device is:
- Connected to the Internet over Wi-Fi
- Connected to a power source
- Screen locked
You can also back up manually whenever your device is connected to the Internet over Wi-Fi by choosing Back Up Now from Settings > iCloud > Storage & Backup.
To learn more about what is backed up, see the iCloud: Backup and Restore Overview article.
How to restore from a backup
When you go through Setup Assistant on a new iOS 5 device, choose "Restore from iCloud Backup" and enter your iCloud account and password. You will see the three most recent backups for each of the devices on which you enabled Backup. Choose from which backup to restore.
After your device restarts, your settings and accounts are restored and Backup starts downloading your purchased music, TV shows, apps, books, Camera Roll, and other content*. You may be prompted to enter the passwords for all accounts enabled on your device.
A progress bar will appear underneath the apps that are being downloaded. To prioritize the restore of a specific app, tap its icon. Restore will attempt to download the same version of the app that you had installed previously. If that version is no longer available, the latest version of the app will be restored.
To check if the restore is complete, go to Settings > iCloud > Storage & Backup. Complete the setup assistant after erasing your device (by going to Settings > General > Reset > Erase All Content and Settings) or after starting your new device. When prompted to set up as new or to restore from previous backup, choose to restore from iCloud backup. Then enter your AppleID and password.
iTunes
How to back up
iTunes can create backups of your iOS device when you:
- Sync with iTunes (disabled if you have iCloud backup turned on)
- Right-click (or Control-click) the iOS device in iTunes under Devices and choose Back Up
Use these steps to manually back up your iOS device using iTunes:
- Connect your iOS device to a computer with the latest version of iTunes installed
- Select your iOS device in iTunes under Devices
- Right-click (or Control-click) the device and select Back Up
iOS device backups preserve your settings, the Camera Roll (or Saved Pictures), and other important data. Learn more about what is stored in a backup.
How to restore from a backup
To restore information from a backup, use one of the following methods after connecting your iOS device to the computer with which you normally sync:
- Right-click (or Control-click) the device and choose Restore from Backup
- If you have a new phone, you can connect to iTunes and it will prompt to restore from your backup
Additional Information


Saturday, September 21, 2013
Install Activate iOS 5 Beta 7 Without Developer Account Registered UDID Links Full Guide Jailbreak
We’re showing in this post an exclusive guide to install and activate iOS 5 beta 7 without developer account or a registered UDID. We will use the Sn0wbreeze 2.8b7 tool to remove the UDID check of iOS 5 beta 7. We’ve tried this guide on a non-developer iPhone 4 and it worked successfully, just follow the below steps carefully and you’ll get iOS 5 beta 7 jailbroken on your iOS device.
This guide supports all devices except iPhone 3GS old bootrom and the iPad 2. You’ll of course need iOS 5 beta 7 firmware .DMG file and iTunes 10.5 beta 7. We’ll show you how to convert .DMG iOS 5 file to .IPSW and install it using iTunes 10.5 beta 7.
How to Install, Activate and Jailbreak iOS 5 Beta 7:
STEP 1: Download iOS 5 beta 7 firmware .DMG file for your iOS device and iTunes 10.5 beta 7 from the links found here.
STEP 2: Get free TransMac to convert / change .DMG file to .IPSW using the video guide here.
STEP 3: Now download Sn0wbreeze 2.8b7b from here.
STEP 4: Open Sn0wbreeze 2.8b7 then hit Browse point and point it to the extracted .IPSW iOS 5 beta 7 file you got from Step 2.

STEP 5: If everything goes okay, you’ll get your device identified as below:

STEP 6: Now click on Expert Mode then Build IPSW.

STEP 7: After building your custom IPSW file of iOS 5 beta 7, you’ll have to get your device in DFU mode. Just follow the on-screen instructions to PWN DFU mode your device.

STEP 8: After getting the black screen on your iOS device, head to the installed iTunes 10.5 beta 7 from Step 1 and open it up.
STEP 9: Before restoring your device, make a backup for your settings, contacts, photos and etc. by right clicking on your iPhone’s icon and hit Backup.

STEP 10: Now, while holding the Shift key, click on Restore and point it to the Sn0wbreeze custom IPSW you’ve already made.

STEP 11: Wait few minutes and you’ll finally get your iPhone, iPad or iPod touch with iOS 5 beta 7.
STEP 12: After done with iOS 5, you’ll need to backup your iOS things. Just open iTunes and restore from your old Backup.

Notes:
- In case you got Error 10, then you’re not using iTunes 10.5 beta 7.
- In case you got other Errors, then you didn’t put your device in DFU mode. Just use iREB (download here) to put your device in PWN DFU mode.
- In case you got other Errors, then you didn’t put your device in DFU mode. Just use iREB (download here) to put your device in PWN DFU mode.

- iOS 5 beta 7 is tethered only jailbroken, so you’ll have to use iBooty (Sn0wbreeze 2.8b7 downloads it in the same directory of your custom IPSW) everytime your iPhone is rebooted to get Cydia installed again.

That’s it! You’ll be able now to enjoy jailbroken iOS 5 beta 7 on your iPhone, iPa and iPod touch. Let us know how it does with you in the comments section below.
Subscribe to:
Posts (Atom)