Showing posts with label windows. Show all posts

Monday, October 7, 2013

Sn0wbreeze 2 8b1 Released To Jailbreak iOS 5 Beta 1 Tethered On Windows

iH8sn0w has finally updated sn0wbreeze. Sn0wbreeze 2.8b1 is now available for download and will jailbreak iOS 5 beta 1 tethered on iPhone, iPad and iPod touch.
sn0wbreeze v2.8 BETA 1 Release Notes:
————————————–
* Supports iOS 5.0 BETA 1 (9A5220p)
* Supports the following Devices:
- iPhone 3GS
- iPhone 4 [GSM]
- iPhone 4 [CDMA]
- iPod Touch 3G
- iPod Touch 4
- iPad 1G
————————————–
* Props to @MuscleNerd for the kernel patches. :)
————————————–
* THIS IS INTENDED FOR DEVELOPERS ONLY!!!
* This sn0wbreeze does NOT add afc2 or Hacktivate to prevent users from removing the UDID check after jailbreak.
* UNLOCKERS SHOULD STAY AWAY!!!
* This is a /TETHERED/ jailbreak via iBooty.
————————————–
Now available at: http://ih8sn0w.com/sb28b1
————————————–
// iH8sn0w
Please keep in mind that iOS 5 beta 1 jailbreak is tethered as of now and will require you to connect your jailbroken device to the computer every time you boot it up
Read More..

Tuesday, October 1, 2013

How to Use Sn0wbreeze To Untethered Jailbreak iOS 4 3 3 And 4 2 8 Windows

Click here to enlarge


A new version of sn0wbreeze was released, which is able to untethered jailbreak iOS 4.2.3 and iOS 4.2.8 for Verizon iPhone 4. This tool allows you to create a custom firmware, and in this tutorial we’re going to show you exactly how to use it.

Compatibility:
  • iPhone 3G[S]/4/Verizon 4
  • iPod Touch 3G/4
  • iPad 1
  • Apple TV 2
How To:
NOTE: the below tutorial uses screenshots from our previous sn0wbreeze tutorial. Don’t worry about it, the necessary adjustments have been made and the process is exactly the same.


1. Download
Hotfile.com: One click file hosting: sn0wbreeze-v2.7r2.zip
NOTE: Windows Vista/Win7 users , you will need to run the toll in Administrator mode. To do that, right click on the tool’s icon and select ‘Run as administrator’…

3. Connect your iOS device

4. Open Snowbreeze and you will see a splash screen which tells you that this software is not for commercial use. Click OK ( see splash screen above ). On the next screen just click on the blue arrow to continue…

5. Now you will need to choose the stock iOS 4.3.3 downloaded earlier. Click on ‘Browse’, select it and click ‘Open’…


Click here to enlarge

6. Choose ‘Expert Mode’ and click on the blue arrow to continue…

Click here to enlarge

7. Now we need to customize our firmware. Just click on ‘General’ and then, click on the blue arrow to continue…
8. Here you can add:
  • animated bootlogos
  • choose to install openSSH
  • resize the root partition
  • add native backgrounding, user wallpaper, battery percentage etc

Click here to enlarge

9. Once you are done, click on the blue arrow to continue. Now sn0wbreeze will create the custom firmware

10. Now, you will need to put the device in DFU mode. Follow the instructions on the screen.

Click here to enlarge

11. Open iTunes. It will prompt you with a message that it found a device in recovery mode. Click OK…

Click here to enlarge

12. Hold down the Shift key and click on restore. Choose the custom firmware you just created and click open. MAKE SURE it’s the custom firmware and not the stock one… ( you will recognize the custom one because it’s called ‘sn0wbreeze_iPhone_xxx’ )

13. Wait for iTunes to restore your iOS device with the custom firmware.

14. That’s it. Enjoy
Read More..

Sunday, September 29, 2013

windows 8 Dual Boot Installation with XP


Got your hands on the Windows 8 beta and want to dual boot it alongside Windows XP? If youre dying to try out Windows 8 but arent ready to give up your installation of XP or Vista, lets take a look at how to
dual boot Windows  with XP .our step-by-step tutorial to get you up and running with Microsofts latest OS.

Install Windows 8 in other new partition not the same one with XP. So insert your Windows 8 disc and reboot your computer (youll need to have enabled booting from your DVD drive in your system BIOS,
but most PCs will have this enabled by default).Once the DVD boots up its a simple matter of following
along with the fairly simple installation wizard. When youre choosing installation type, be sure to select Custom (advanced) and choose the partition.

After you select the partition, just follow the steps tell the end of installation.then open your desktop.
and take a look in it.
so to let your windows XP boot you have to :

Open Control panel then scrol down and click on System.

 from system window click in left side on Advanced System settings

 In the Startup and Recovery section of the window that pops up, click the "Settings" button (on the Advanced tab of System Properties)


Change the "Default operating system" option from "Windows Developer Preview" to "Earlier Version of Windows and click OK

reboot your computer then you will get this boot window.

Everytime you shutdown and boot up select ‘Earlier version of Windows’ and you will be booted into Windows XP directly.

Read More..

Thursday, September 26, 2013

How to Run Windows Apps on Mac OS X using WinOnX

Apple Mac PC’s are much faster, elegant than the windows PC but there is one great thing about windows PC’s which can’t be denied, it is that, Windows OS has a very large collection of apps as compared to the Mac OS. if you are a Mac user then you shouldn’t need to be worry now, as now you can run any Windows app on your Mac OS using WinOnX.

All you need to have a Mac OS 10.6 or higher to install this program. WinOnX is an amazing must have emulator for Mac OS and it can be downloaded from MacApp store for just $4.99.


How to Run Windows Programs on Mac OS X using WinOnX :


Step 1: The first is to download and install WinOnX from the Mac App store.


Step 2: Download and install any Windows app that you want to run on your Mac OS.


Step 3: The last step is to locate the program on your Mac. Double click on it and start enjoying Windows app on your Mac OS.


Well, in this way you can use any windows app on your Mac OS for just $4.99.
Read More..

Collection Free Software of Tweaking Windows

Collection Free Software of Tweaking Windows
Collection Free Software of Tweaking Windows - Tweaking Windows or enable features or hidden windows settings is an interesting thing to do. Although it can be done manually such as by editing the Registry, but maybe not everyone can do. Fortunately, now many free software for tweaking windows.

Heres a collection of various free software that provides many features for tweaking windows.


TweakNow PowerPack 2012
An artificial tweaknow.com software that provides a variety of  tweaking windows  and optimization features. So many features included in the update and still to this day.Provides a common feature  tweaking windows , Cleaner, disk usage analysis, registry cleaner, the RAM optimizer, system information and more. 

Collection Free Software of Tweaking Windows

TweakNow PowerPack is more complete than  TweakNow  WinSecret. The program supports Windows XP, Vista, 7 and Windows 8. To download TweakNow PowerPack 2012 (9.1 MB) 


Ultimate Windows Tweaker
This may be a program with the most small size and portable. With just one exe file which is about 345 KB, Ultimate Windows Tweaker provides a variety of features ranging from tweaking windows system information, user accounts, performance, security settings,network, and various other  tweaking (total about 150 tweaking windows). 

Collection Free Software of Tweaking Windows

Just Supports Windows Vista and Windows 7.


X-Setup Pro
Tweaking the software was previously a paid software, but now a freeware or free.Tweaking windows has a feature very much, and perhaps the most comprehensive because it includes more than 1800 tweaking windows. Unfortunately, this software was not updated for a long time since windows 7. But for users of Windows XP, this programshould be an option. 

Collection Free Software of Tweaking Windows

In addition to the installer version, Portable version also available. Supports Windows9x/NT/2000/XP and Vista (from other sources also said to support Windows 7).

RegToy
As with X-Setup, RegToy is tweaking software that provides many features  tweaking windows . In addition to the installer version, available jug portable version. Not only tweaking the look and performance of windows, various features are also included in it such as hardware optimization, security, startup manager, service manager, uninstall, registry cleaner and backup, disk and other clean. 

Collection Free Software of Tweaking Windows

Unfortunately, this software was not updated for a long time yet, so it seems not to support windows 7. But for users of Windows XP and Vista could be an alternative software tweaking. To download RegToy (2:18 MB portable version and installer 1.63 MB) 


Advanced System Tweaker
This software can be said that the most recent, since 1:00 version just released a few days ago. Advanced System Tweaker is a free software that has made ??Tweaking.com  tweaking windows  features, such as Maintenance (maintenance windows), optimization of speed and ulitily repair windows errors or other problems. 

Collection Free Software of Tweaking Windows

Advanced System Tweaker tweaking but it may not only suitable for repair if something goes wrong with the window itself. And one unique is the availability of the command command prompt / edit the registry manually for most of the tweaking that is used.Download and more information visit Advanced System Tweaker.


Mz Ultimate Tools
Software made ??by Michael Zacharies (so-called MZ) has many features that quite a lot oftweaking, comparable to or TweakNow RegToy. The program is available for WindowsXP, Vista and Windows 7, and each is a separate application. So be sure to download according to the windoes we use. Has many features such as increased performance,tweak the display windows, security, memory, network, and many others. 

Collection Free Software of Tweaking Windows

This software last updated in December 2010, and unfortunately there are no more updates until today. Download  Mz Ultimate Tools.

Perhaps there are many more software tweaking the other windows, as some members of the other larger programs, such as Glary Utilities, Advanced System Care and so on.But the collection of the above may be sufficient for some of us who want to tamper with the settings windows without the hassle of dealing directly with the registry.
Read More..

Monday, September 23, 2013

How to Install the Windows 8 Consumer Preview

The next big operating system from Microsoft is almost ready and we’ve been anticipating its arrival for a while now. So, the final release is still
How to - Install the Windows 8 Consumer Preview
The next big OS from Microsoft is almost ready and we’ve been anticipating its arrival for a while now. So, the final release is still sometime away, from release but the second major preview that was expected early this year is here. MWC 2012 is almost over and Microsoft has gone ahead and opened up the gates for users to download and try out the new platform.

The first open build - the Windows 8 Developer Preview was made available for download in September 2011. The Windows 8 Consumer Preview is a more refined build and is something that should be functional till early 2013. So, let’s quickly look at how to download and install the operating system on your PC. We’ll start by first explaining how to install Windows 8 on a clean system and then, also how to upgrade your Windows 7 operating system to Windows 8 without losing too many settings.

However, before starting, we suggest you backup any important data and applications just in case.

Download Windows 8 Consumer Preview
The first step is of course, to download the operating system. Microsoft has setup a download page from where you can download a tool that will check your hardware and software to see if they’re compatible with Windows 8. If you want more information on the system requirements for Windows 8, head over to one of our news story on the official availability of the preview. The tool then downloads Windows 8 for you. You also have the option to download disc images (ISO images) and burn them on a disc and install it. There are 32-bit and 64-bit builds available on this page. Microsoft has also provided a serial key that can be used to install the operating system.

Burn a copy of Windows 8 on a DVD
Once you’ve downloaded the ISO file, burn it using a disc burning software. If you don’t have one installed, you can always use the default Windows Disc Image Burner that’s part of Windows 7, for example. If you don’t have one, you can download a copy of CDBurnerXP  for free. Microsoft offers other options for installing Windows 8 off a USB stick using their USB/DVD tool. Once you’ve chosen how you want to install Windows 8, the process is pretty common and straight forward. In fact, many of the initial steps are similar to Windows 7.
Downloading Windows 8 from the Microsoft site


In the case of a clean install, the entire hard drive or at least, one partition ought to be free. Microsoft recommends 16GB of free space if you’re installing the 32-bit version and 20GB if you opt for the 64-bit version.


Setup from an existing Windows installation
If youre doing a clean install of Windows 8, skip this. But assuming that you have Windows already installed, simply insert the burnt DVD and open Windows Explorer. If you have Autorun enabled, the installation setup should start automatically. If it doesnt, double click on the setup.exe in the DVD. The installation will ask you whether youd like to update the installation before it begins. If you dont want to do this, you can click the Skip button.
Keeping existing Windows settings and data


Next, enter the product key provided by Microsoft on their download page. The next step is to choose which items from the existing Windows installation you’d like to keep. Choose one of the following and click Next. The user has the option to save Windows settings and personal documents or just personal documents. If you do not want to save anything, you have the option to do that too. The installation will then begin.
Read More..

Friday, September 20, 2013

Sn0wbreeze Updated To v2 6 1 To Untethered Jailbreak The Verizon iPhone 4 Windows

sn0wbreeze Sn0wbreeze Updated To v2.6.1 To Untethered Jailbreak The Verizon iPhone 4 [Windows]
Just a quick heads-up: ih8sn0w just pushed a new update to sn0wbreeze which brings the software to v2.6.1. This update allows us to create a custom .ipsw on Windows machines and untethered jailbreak the Verizon iPhone 4 running iOS 4.2.7.

Compatibility:
  • iPhone 3G/3G[S]/4/Verizon 4
  • iPod Touch 2G/3G/4
  • iPad 1
  • Apple TV 2
Download:
How to use:
  • the process remains unchanged in this update. If you don’t already know how to use this tool, check out out previous sn0wbreeze tutorial

HOW TO: Use Sn0wbreeze To Untethered Jailbreak iOS 4.2.1 [video]

sn0wbreeze 51 HOW TO: Use Sn0wbreeze To Untethered Jailbreak iOS 4.2.1 [video]
A new version of sn0wbreeze was released, which is able to untether jailbreak iOS 4.2.1. This tool allows you to create a custom firmware, and in this tutorial we’re going to show you exactly how to use it.

Snowbreeze is compatible with:
  • iPhone 3G/3GS/4
  • iPod Touch 2G/3G/4
  • iPad
How To:
1. Download Sn0wbreeze
2. Download stock iOS 4.2.1
NOTE: Windows Vista/Win7 users , you will need to run the toll in Administrator mode. To do that, right click on the tool’s icon and select ‘Run as administrator’…
3. Connect your iOS device
4. Open Snowbreeze and you will see a splash screen which tells you that this software is not for commercial use. Click OK ( see splash screen above ). On the next screen just click on the blue arrow to continue…
5. Now you will need to choose the stock iOS 4.2.1 downloaded earlier. Click on ‘Browse’, select it and click ‘Open’…
sn0wbreeze 3 HOW TO: Use Sn0wbreeze To Untethered Jailbreak iOS 4.2.1 [video]
6. Choose ‘Expert Mode’ and click on the blue arrow to continue…
sn0wbreeze 2 HOW TO: Use Sn0wbreeze To Untethered Jailbreak iOS 4.2.1 [video]
7. Now we need to customize our firmware. Just click on ‘General’ and then, click on the blue arrow to continue…
8. Here you can add:
  • animated bootlogos
  • choose to install openSSH
  • resize the root partition
  • add native backgrounding, user wallpaper, battery percentage etc
sn0wbreeze 1 HOW TO: Use Sn0wbreeze To Untethered Jailbreak iOS 4.2.1 [video]
9. Once you are done, click on the blue arrow to continue. Now sn0wbreeze will create the custom firmware
10. Now, you will need to put the device in DFU mode. Follow the instructions on the screen.
15. Open iTunes. It will prompt you with a message that it found a device in recovery mode. Click OK…
16. Hold down the Shift key and click on restore. Choose the custom firmware you just created and click open. MAKE SURE it’s the custom firmware and not the stock one… ( you will recognize the custom one because it’s called ‘sn0wbreeze_iPhone_xxx’ )
17. Wait for iTunes to restore your iOS device with the custom firmware.
18. That’s it. Enjoy
NOTE: sn0wbreeze may fail. If it does, visit ih8sn0w’s website and check if there is an updated version available
Read More..

Wednesday, September 18, 2013

Remove a Windows Boot Camp Partition From Your Mac

These are instructions on how to remove a Windows Boot Camp partition and expand your Mac OS X partition to regain the newly available hard drive space.


Step One
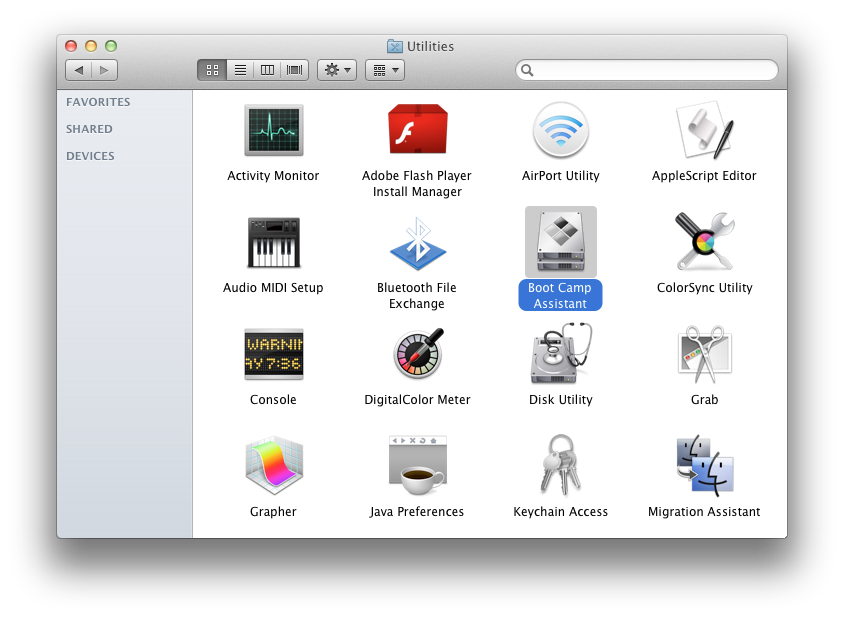
Launch Boot Camp Assistant from the Applications:Utilities folder.
Click here to enlarge

Step Two
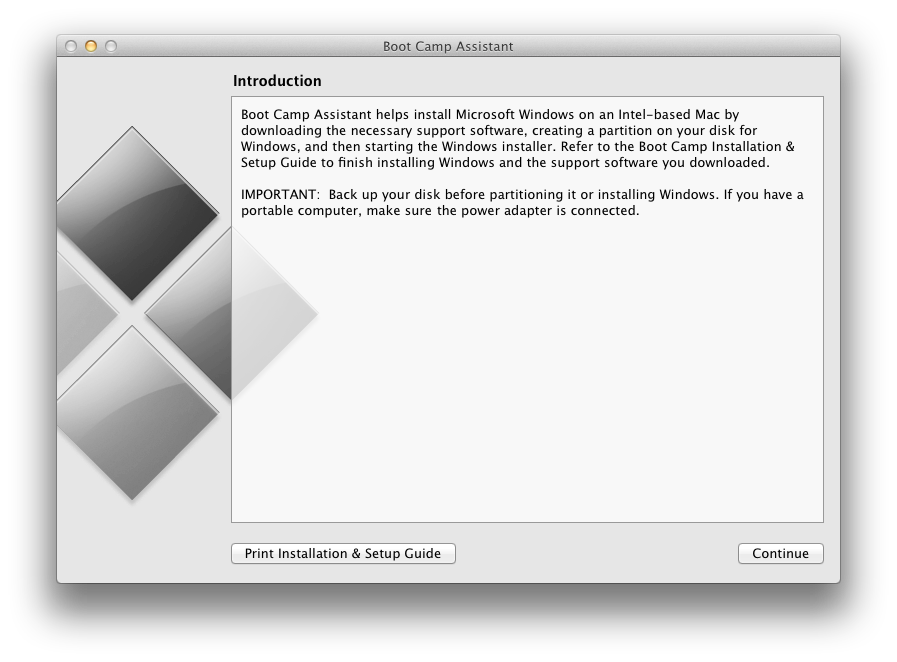
Click the Continue button.
Click here to enlarge

Step Three
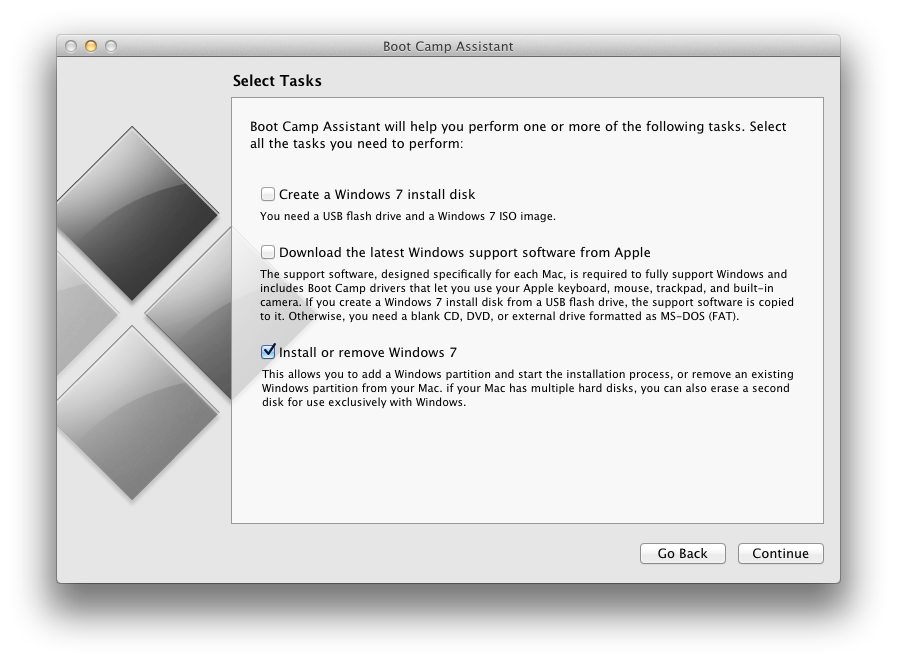
Check only the Install or remove Windows 7 option and click Continue.
Click here to enlarge

Step Four
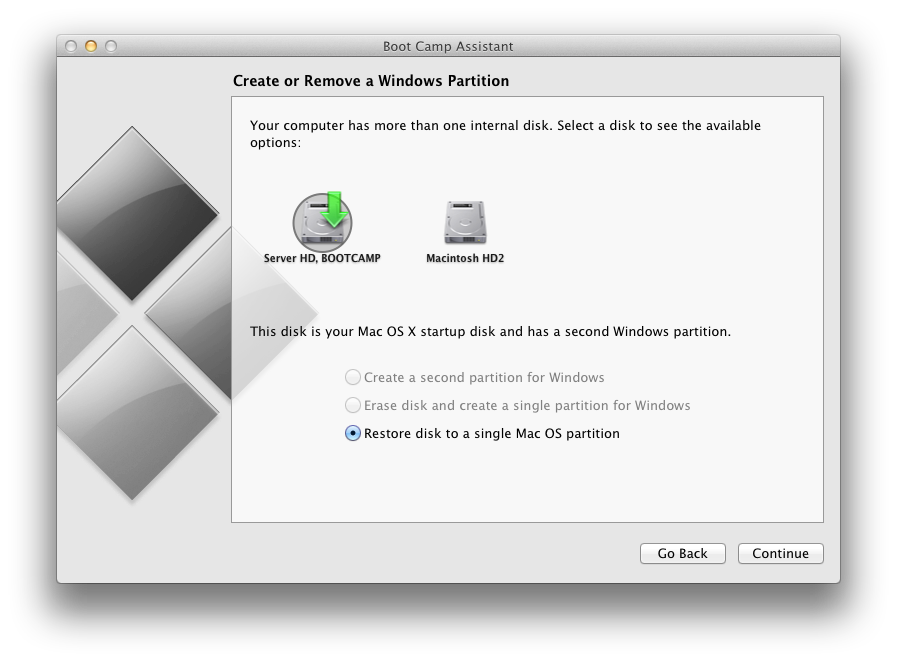
Choose Restore disk to a single Mac OS partition and click Continue.
Click here to enlarge

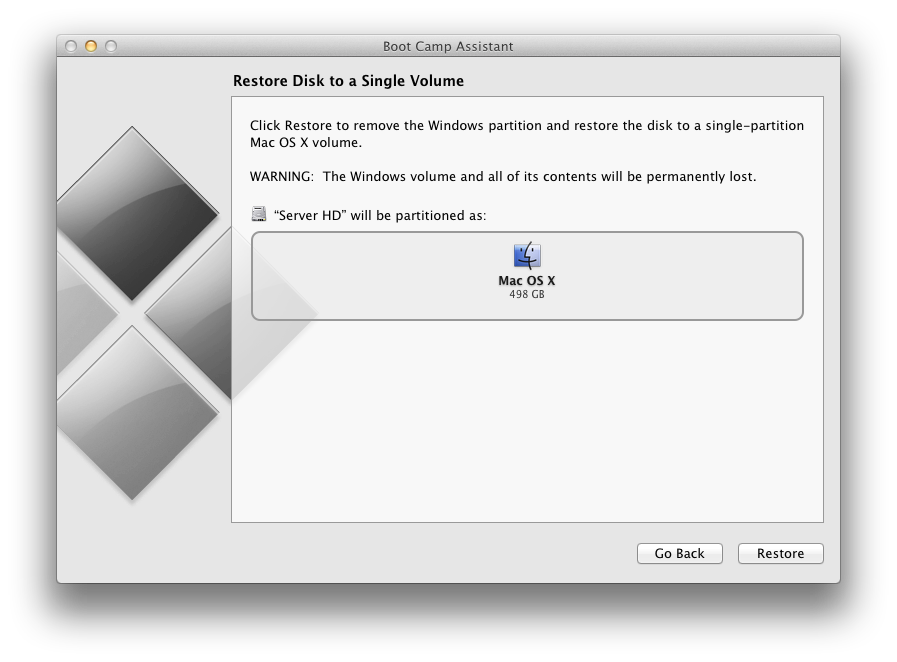
Step Five
Click the Restore button to begin.
Click here to enlarge

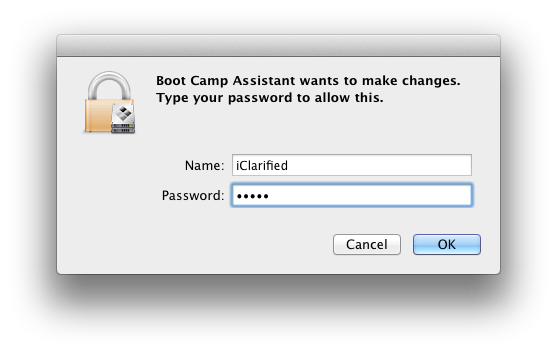
Step Six
You will be asked to login with your Administrative username and password. Enter these and click the OK button.
Click here to enlarge

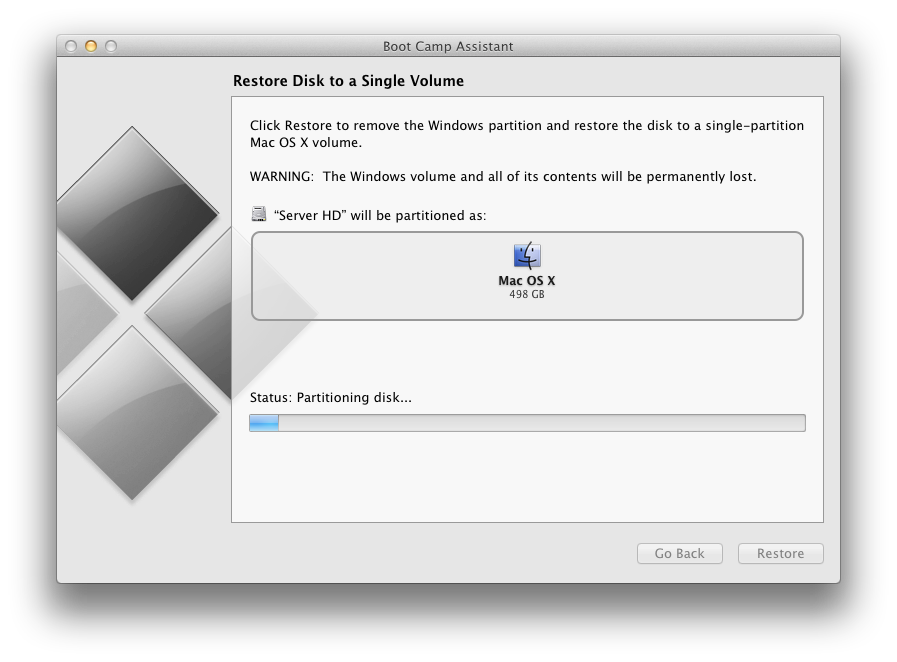
Step Seven
You disk will now be repartitioned to remove the Windows volume.
Click here to enlarge

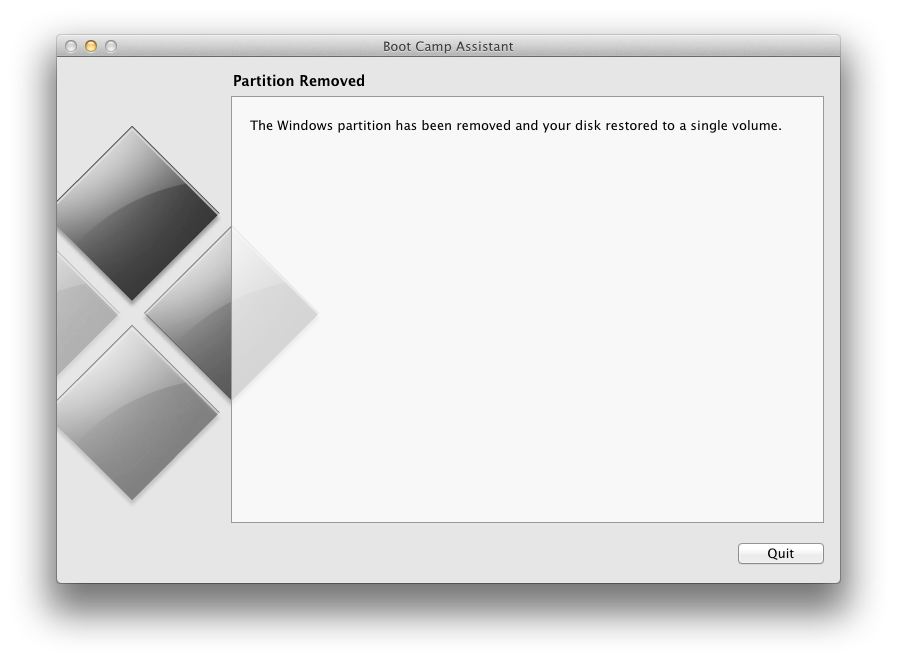
Step Eight
You will be informed that your disk has been restored as a single volume. Click the Quit button.
Click here to enlarge
Read More..

Tuesday, September 17, 2013

How to Jailbreak Your iPad 1 Using RedSn0w Windows 4 3 5

These are instructions on how to jailbreak your iPad 1 on the 4.3.5 firmware using RedSn0w for Windows. The Mac version of this tutorial is here. If you are on 4.3.3 or lower make sure you do NOT update to iOS 4.3.5. Use the untethered JailbreakMe instead. You can find the appropriate JailbreakMe tutorial here.

Step One
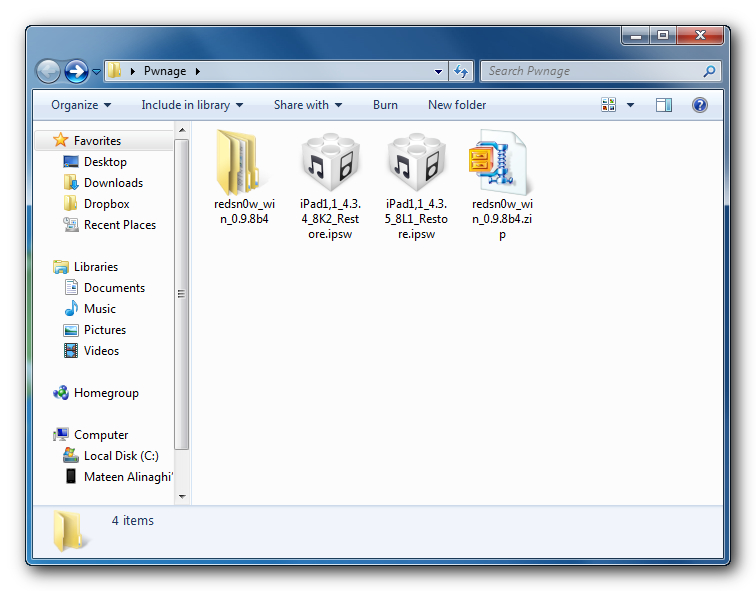
Create a folder on your desktop called Pwnage

Download RedSn0w from here and place it in the Pwnage folder. Likewise, download the latest 4.3.4 and 4.3.5 firmware from below and place it in the same folder.

4.3.4 (iPad 1): iPad1,1_4.3.4_8K2_Restore.ipsw
4.3.5 (iPad 1): iPad1,1_4.3.5_8L1_Restore.ipsw

Extract the RedSn0w zip file into the same folder.
Click here to enlarge

Step Two
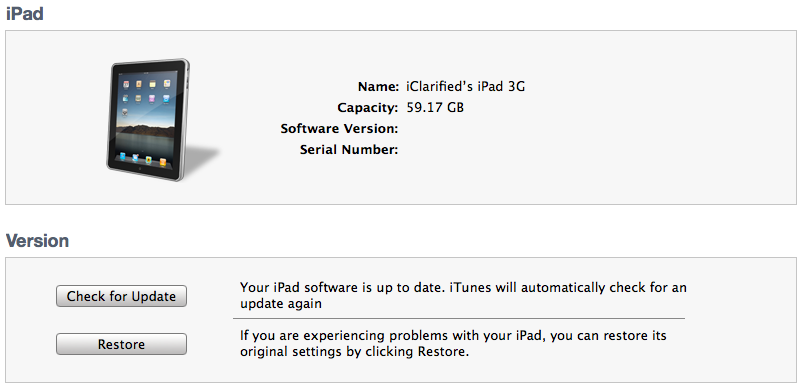
Connect your iPad to the computer and launch iTunes.
Click here to enlarge

Select your iPad from the list of devices on the left. Now hold down Shift and click the Restore button. Restore is preferred as it wont create any wasted space on your iPad.
Click here to enlarge

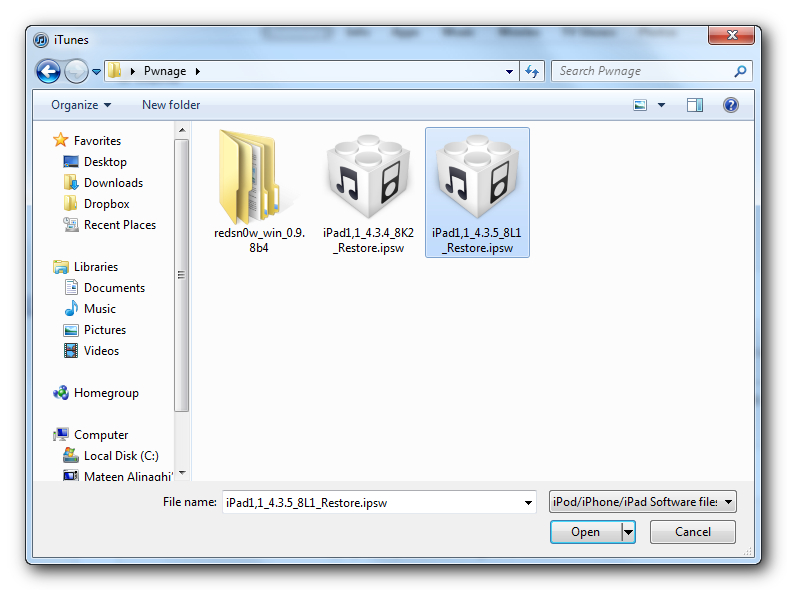
Navigate to the Pwnage folder on your desktop and select the 4.3.5 firmware ipsw. Click the Choose button to continue.
Click here to enlarge

Step Three
Once iTunes has finished updating your iPad to the desired firmware open the Pwnage folder on your desktop and launch the redsn0w application from the redsn0w folder we extracted earlier.

**Windows 7 users may need to run RedSn0w in Vista Compatibility mode. You can do this by right clicking the executable and selecting Properties from the contextual menu.
Click here to enlarge

Step Four
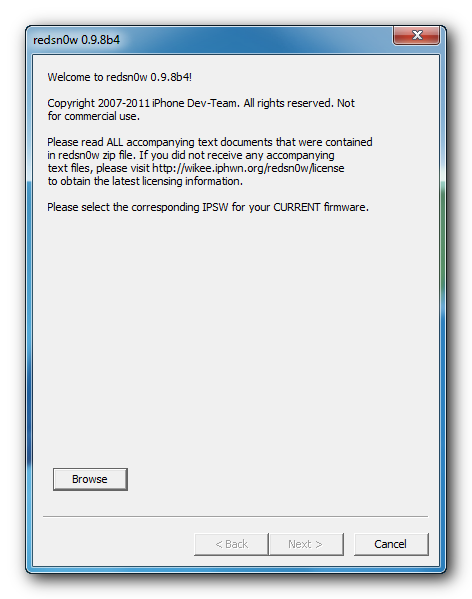
Once RedSn0w opens click the Browse button
Click here to enlarge

Step Five
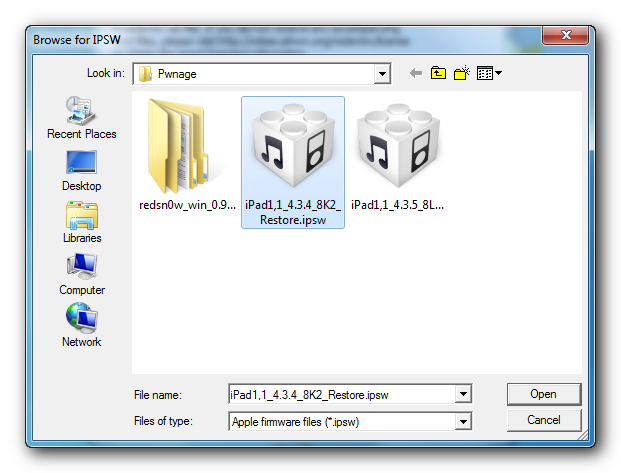
Select the 4.3.5 firmware ipsw we placed in the Pwnage folder on our desktop then click Open.
Click here to enlarge

Step Six
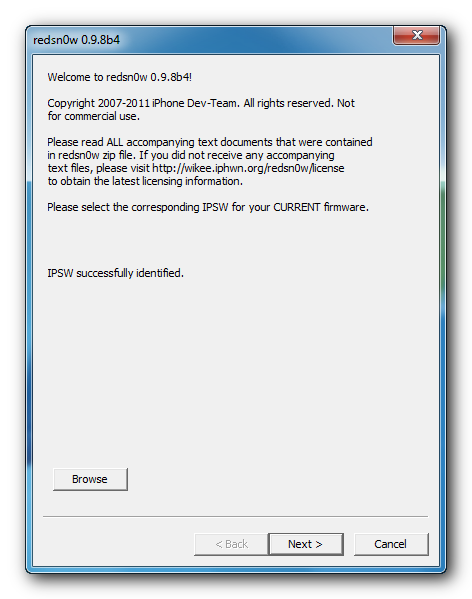
Once the firmware has been verified click the Next button to continue.
Click here to enlarge

Step Seven
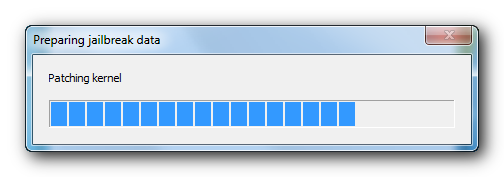
RedSn0w will now prepare the jailbreak data
Click here to enlarge

Step Eight
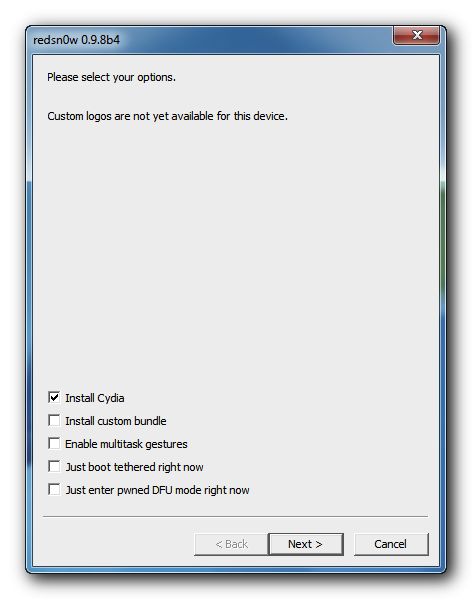
From this window you can select the jailbreak options you would like. Make sure Cydia is selected and click the Next button to continue.
Click here to enlarge

Step Nine
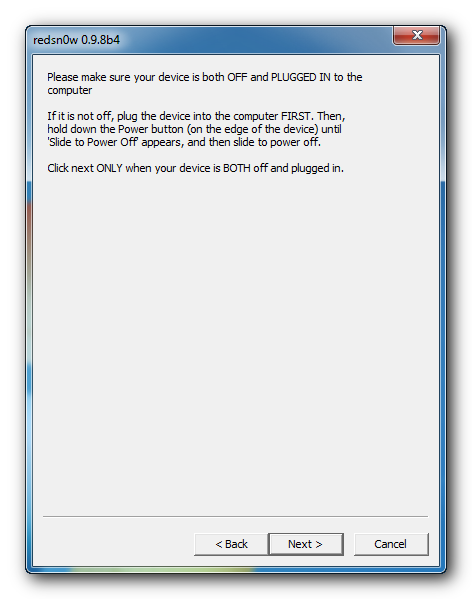
Please plug your iPad into the computer and make sure its OFF then click the Next button
Click here to enlarge

Step Ten
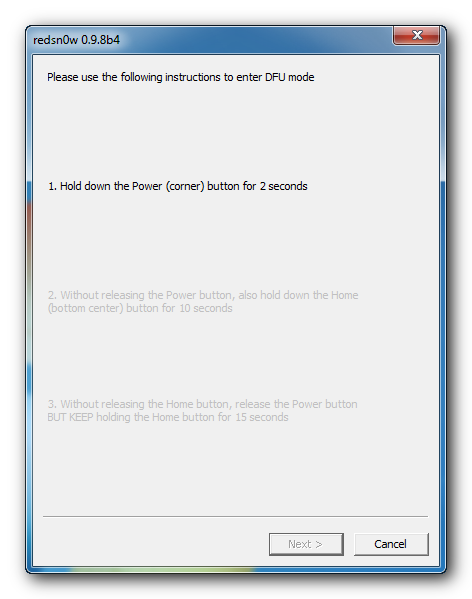
RedSn0w will now guide you through the steps to get into DFU mode. You can find more help with DFU mode here
Click here to enlarge

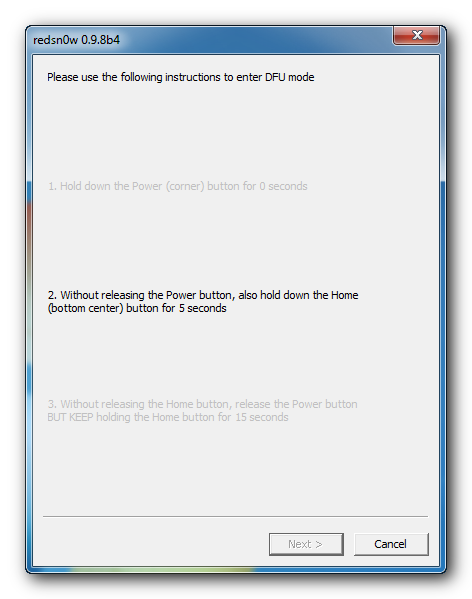
Hold down both the Home button and the Power button for 10 seconds.
Click here to enlarge

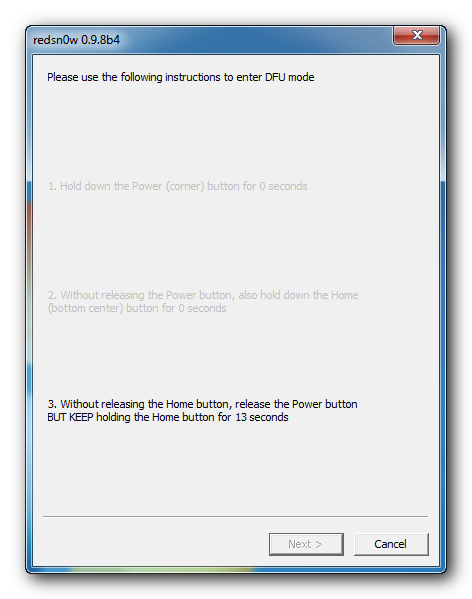
Release the Power button and continue holding the Home button until RedSn0w detects the device.
Click here to enlarge

Step Eleven
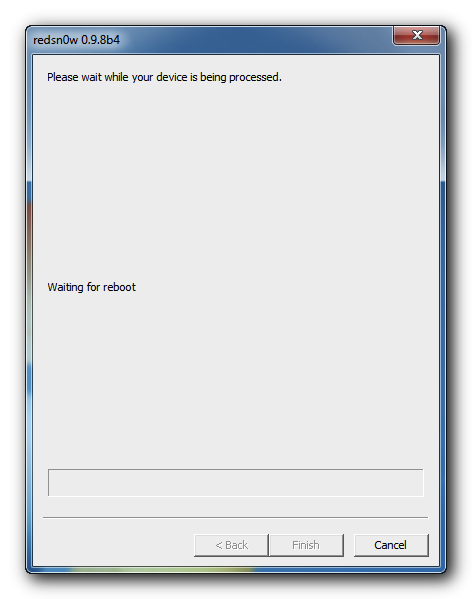
Your iPad will now reboot
Click here to enlarge

Step Twelve
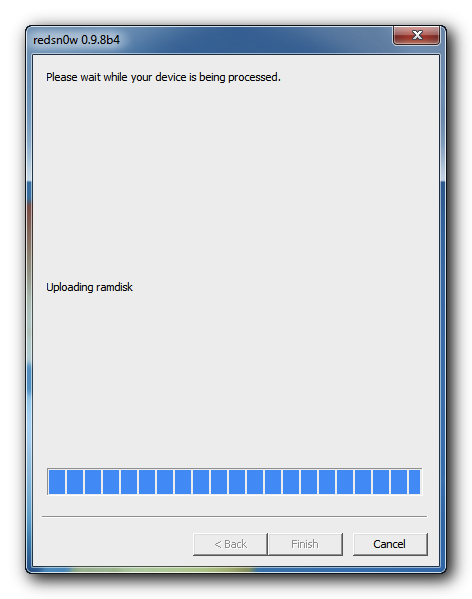
RedSn0w will then begin uploading the new RAM Disk and Kernel.
Click here to enlarge

Step Thirteen
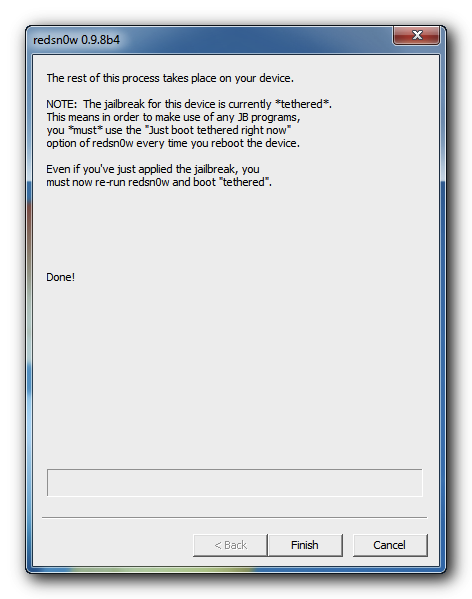
Once this is complete you will be notified that RedSn0w is done. Click the Finish button. When your iPad finishes rebooting (5 minutes or so) it will be jailbroken with Cydia on the SpringBoard.
Click here to enlarge


BOOT TETHERED
Since this is a tethered jailbreak you must use Redsn0w to help you boot back into your jailbroken device if its powered off for any reason. Simply connect your iPhone to the computer, launch RedSn0w, select Just boot tethered right now from the options window and click Next to have RedSn0w boot your device.
Click here to enlarge

*As usual a big thanks to the iPhone Dev-Team for their hard work and contribution to the iPhone community.
**Windows 7 users can try running RedSn0w as an administrator in Windows Vista or XP compatibility mode if you experience any difficulties
Read More..